In this article we will understand about security defaults and Azure Active Directory Multi Factor Authentication and will discuss the difference between on these, what are the prerequisite between MFA and how to set up and configure them. Before understanding MFA we have to know about Security Defaults first.
What Are Security Defaults?
Microsoft provides security defaults to enhance account protection. When you create a new Azure AD tenant, security defaults are enabled by default and included with the free Azure AD subscription. This feature safeguards accounts from hacking by implementing pre-configured security policies.
Key Features of Security Defaults:
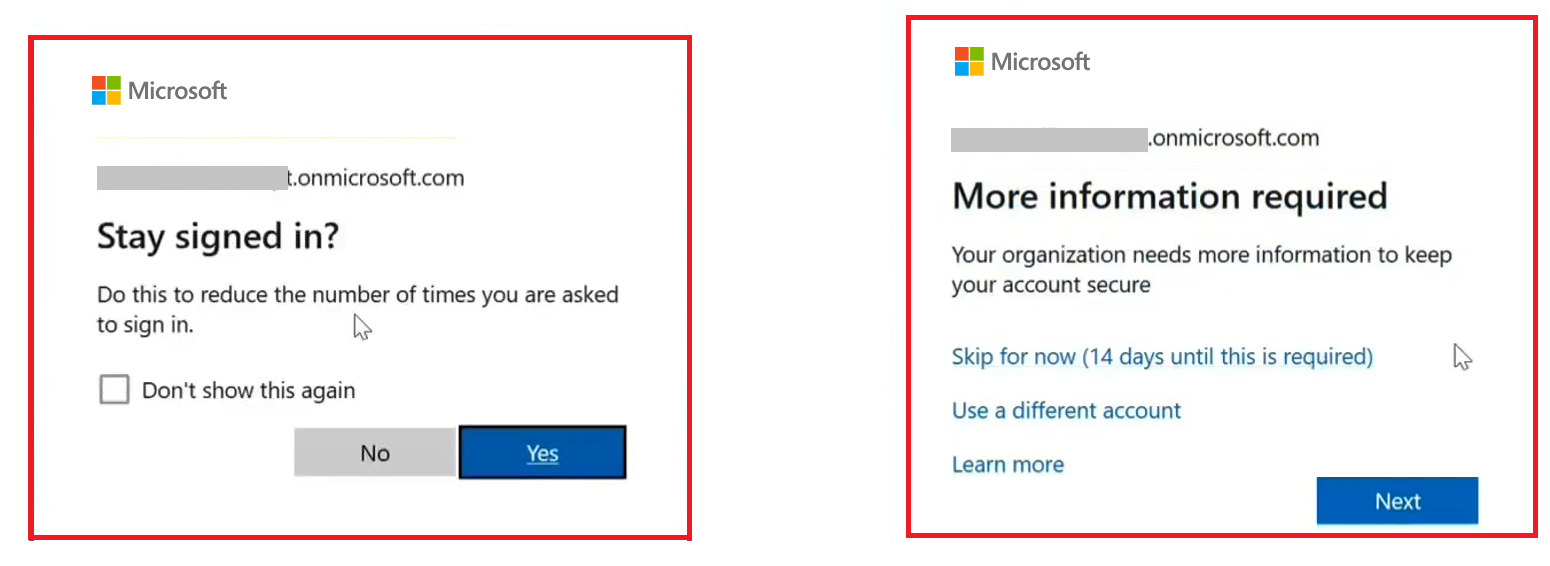
- Mandatory MFA Enrolment: All users, including administrators, must register for MFA. They have 14 days to complete the registration. After this period, users cannot log in until MFA is configured.
- Disabling Legacy Authentication: Security defaults block legacy authentication protocols, such as POP3, IMAP, SMTP. Legacy authentication doesn’t support MFA and can be exploited by attackers to bypass security measures.
- Protection for Azure Services: Actions involving Azure Resource Manager, such as managing services via the Azure Portal, PowerShell, or CLI, require MFA when security defaults are enabled.
Legacy authentication is a type of authentication request that is made by the clients that do not use modern authentication.
For example, Office 2010. Some other clients that use older email protocols also use legacy authentication. For example, POP3, IMAP, or SMTP. Legacy authentication doesn’t support multi-factor authentication. Even if you have a multi-factor authentication policy enabled on your tenant, an attacker can authenticate by using an older protocol and can bypass multi-factor authentication. So when security defaults are enabled in your tenant, all authentication requests made by an older protocol will be blocked. Organizations use multiple Azure services.
So if you have a free Azure Active Directory subscription, you can use security defaults to increase the security for your identities. But there are a couple of limitations of using security defaults.
Benefits and Limitations of Security Defaults:
Benefits:
- Enhanced security for all accounts in your tenant.
- Automatic blocking of outdated and insecure authentication methods.
Limitations:
- Security defaults are enabled for all the users in your tenant. You cannot enable security defaults for a set of users.
- Security defaults apply to all users—you cannot enable them for specific users only.
- MFA enrolment through security defaults is limited to the Microsoft Authenticator app; other methods, like SMS or voice verification, are not supported.
Also Read: What Is LDAP (Lightweight Directory Access Protocol) & Workflow?
Understanding Multi-Factor Authentication
Multi-Factor Authentication (MFA) is a security measure that requires users to verify their identity using two or more methods. Unlike traditional login with just a password, MFA adds an extra layer of protection. It combines something the user knows (like a password), something they have (like a phone or security token), or something they are (like a fingerprint or face scan). This makes it much harder for unauthorized people to access your account, even if they know your password.
Benefits of Implementing MFA in Azure AD
- Enhanced Security: By requiring multiple forms of verification, MFA significantly reduces the risk of unauthorized access, even if one factor (such as a password) is compromised.
- Protection Against Phishing: MFA protects users from phishing attacks, as hackers would need access to both the password and the second factor to successfully log in.
- Compliance: Many industries require MFA to comply with data protection regulations (like GDPR, HIPAA, etc.), ensuring organizations meet security standards.
- Reduced Risk of Data Breaches: With an additional layer of protection, MFA minimizes the chances of a data breach caused by stolen or weak credentials.
- User Confidence: By using MFA, users feel more secure knowing that their accounts are protected with robust security measures.
Setting Up Microsoft Authenticator for Azure AD MFA using Conditional access policy.
So let’s move towards our lab and let me show you how you can use security defaults.
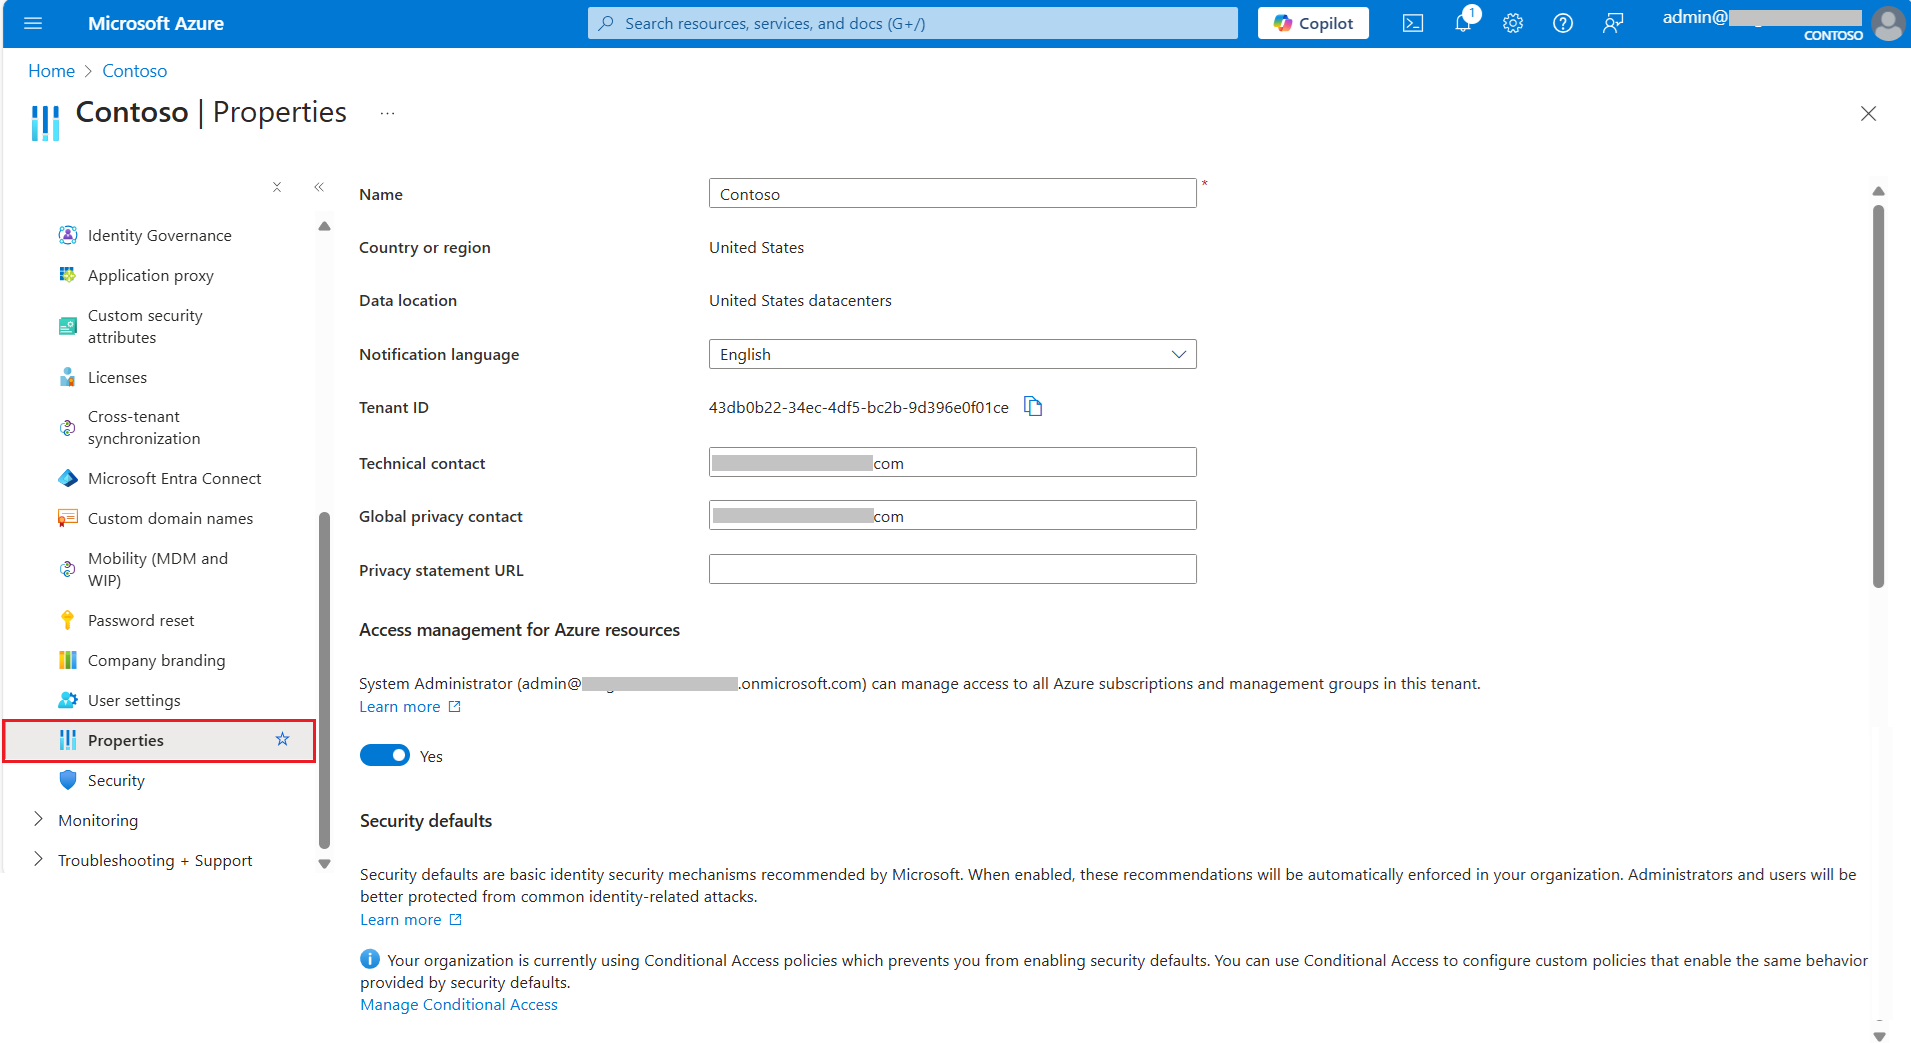
Step 1: Go to https://portal.azure.com/ and search for Microsoft Entra ID

Step 2: Expand Manage and select Properties. You’ll see Access Management Policy and a toggle button to enable or disable. Here it is enable by default but you can disable as per your need.
Step 3: Log in to your Microsoft account. The images below illustrate the difference: on the left, MFA is not enabled through Security Defaults, while on the right, Security Defaults are activated, prompting users to configure MFA within 14 days.
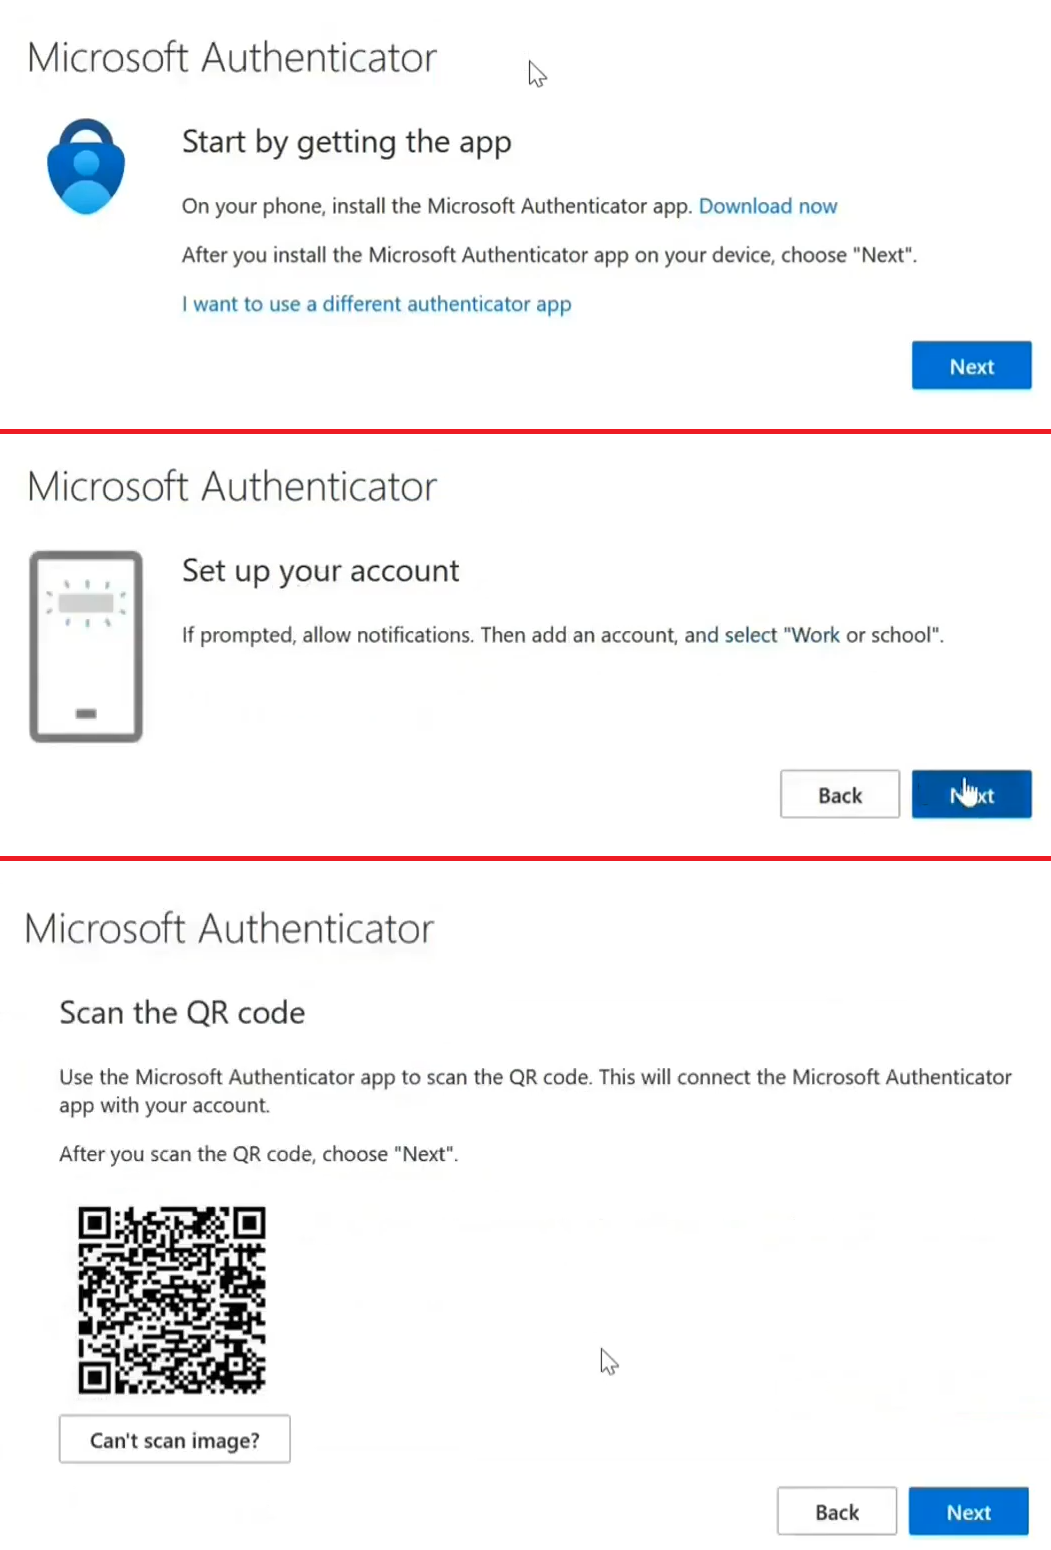
This is the process you need to follow. From your Microsoft Authenticator app you have to scan the bar code.
Security Defaults and Azure Active Directory Multi-Factor Authentication (MFA)
Lets understand the difference Between Security Defaults and Azure Active Directory Multi-Factor Authentication (MFA)
| Feature | Security Defaults | Azure AD Multi-Factor Authentication (MFA) |
|---|---|---|
| Cost | Free feature of Azure Active Directory. | Requires Azure AD Premium P1 license or included with EMS E3, Microsoft 365 E3, or Microsoft 365 Business Premium licenses. |
| Default Availability | Automatically enabled when an Azure AD tenant is created. | Requires configuration and licensing. |
| User Scope | Enabled for all users in the tenant; no option to select specific users. | Can be enabled for all users or a selected set of users. |
| Authentication Methods | Supports only the Authenticator app. | Supports multiple methods: Authenticator app, SMS verification, and phone call verification. |
| Ease of Implementation | Very easy to implement, with no admin-level configuration required. | Requires configuration using Conditional Access Policies. |
| Flexibility | Basic security with limited customization. | Advanced security features with high customization options. |
How to enable Multi Factor Authentication from Azure
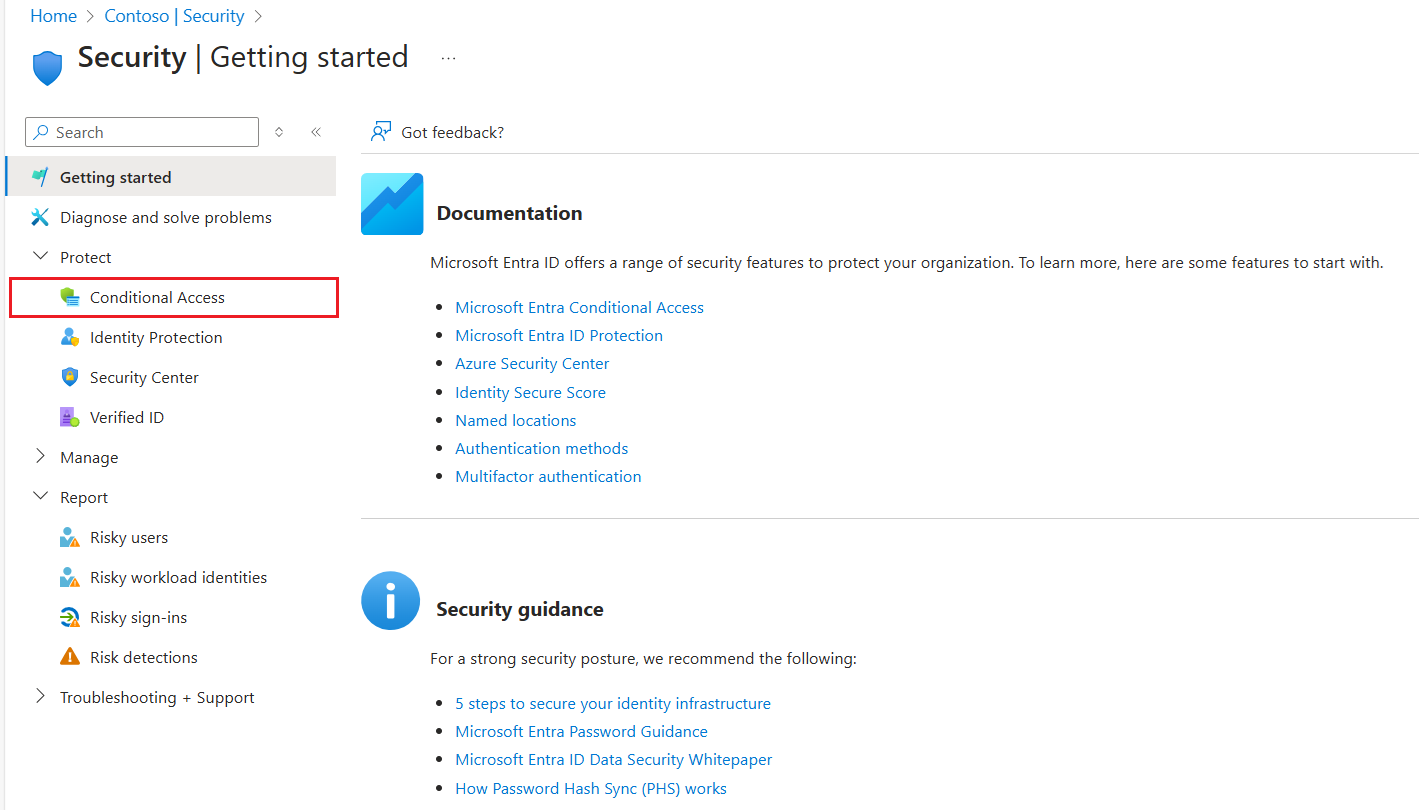
Azure MFA can be configured using conditional access policy. So to configure Azure Multi Factor Authentication click on Microsoft Entra ID as we did before. Then select SECURITY
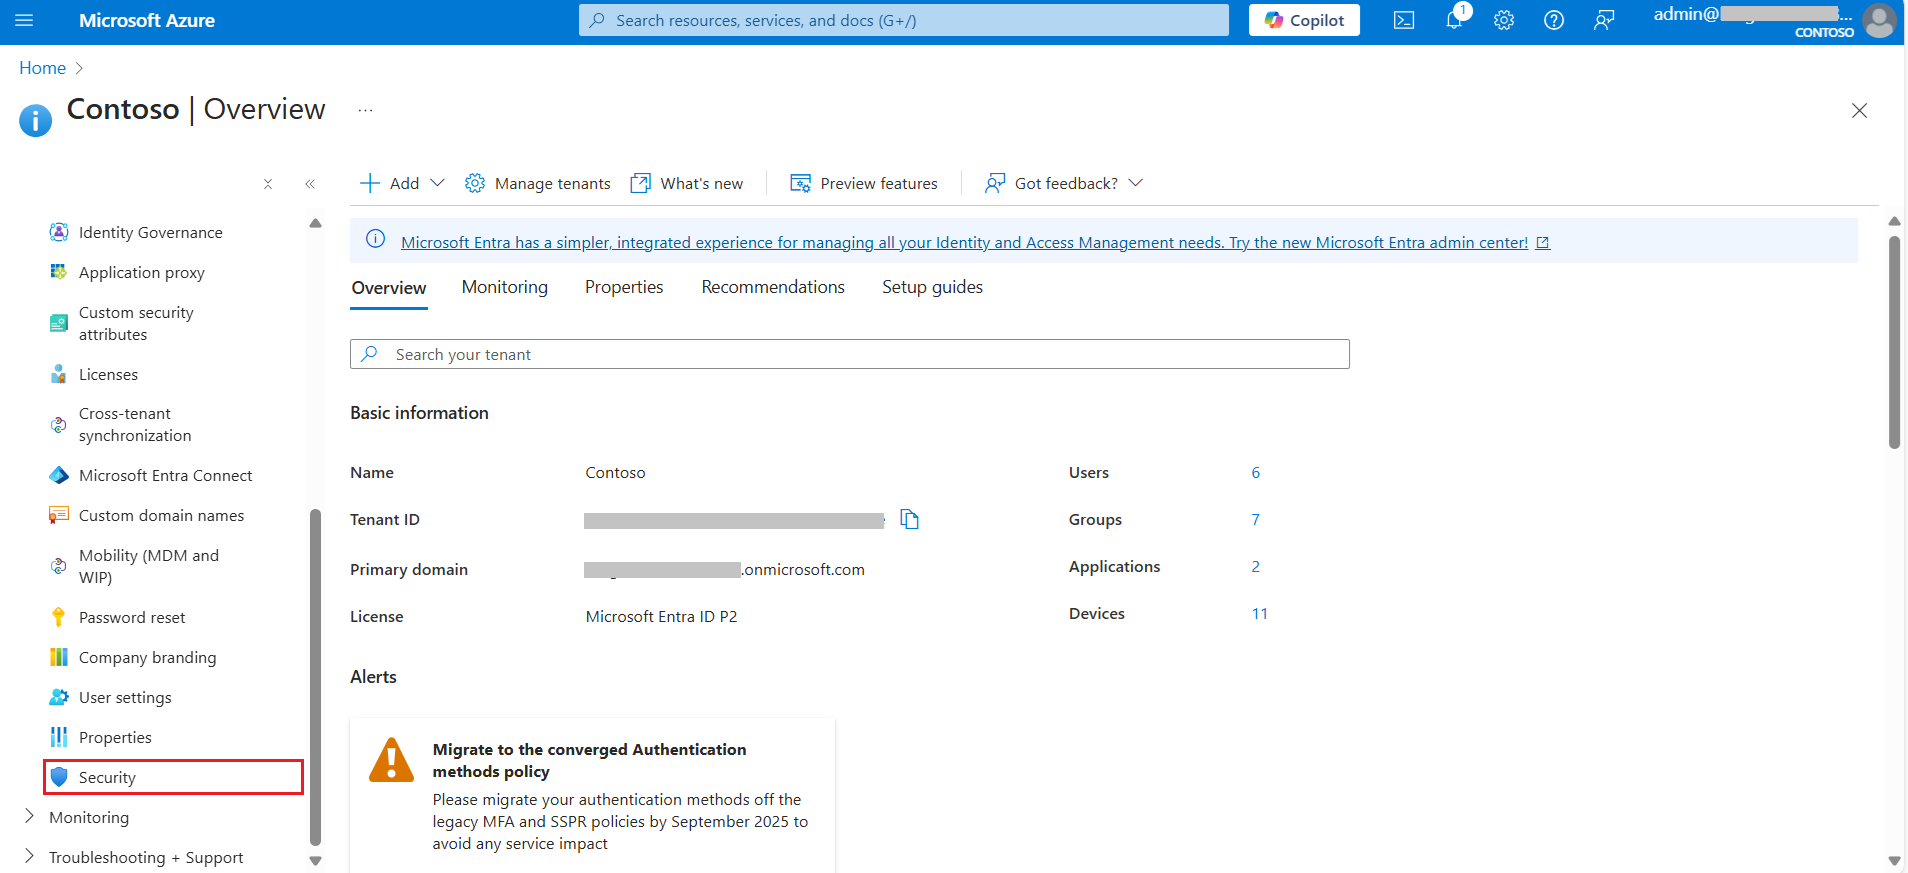
Click on Conditional access policy.
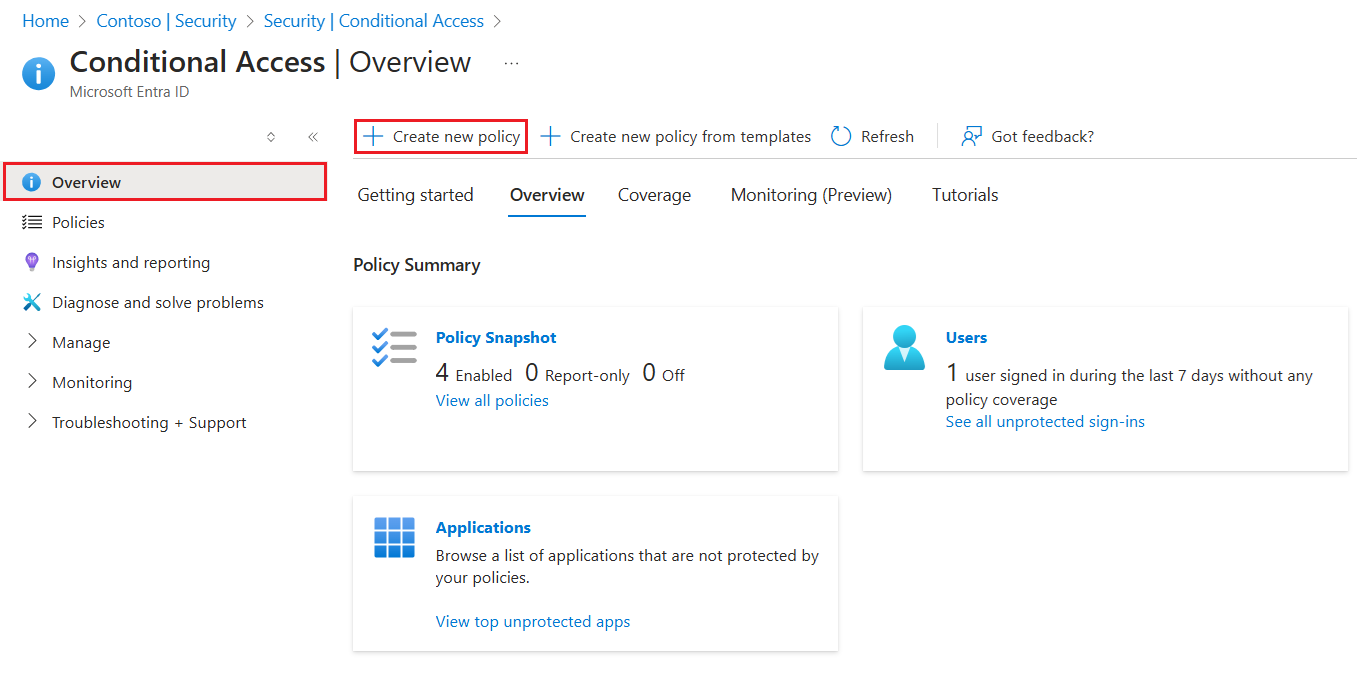
Create New Policy
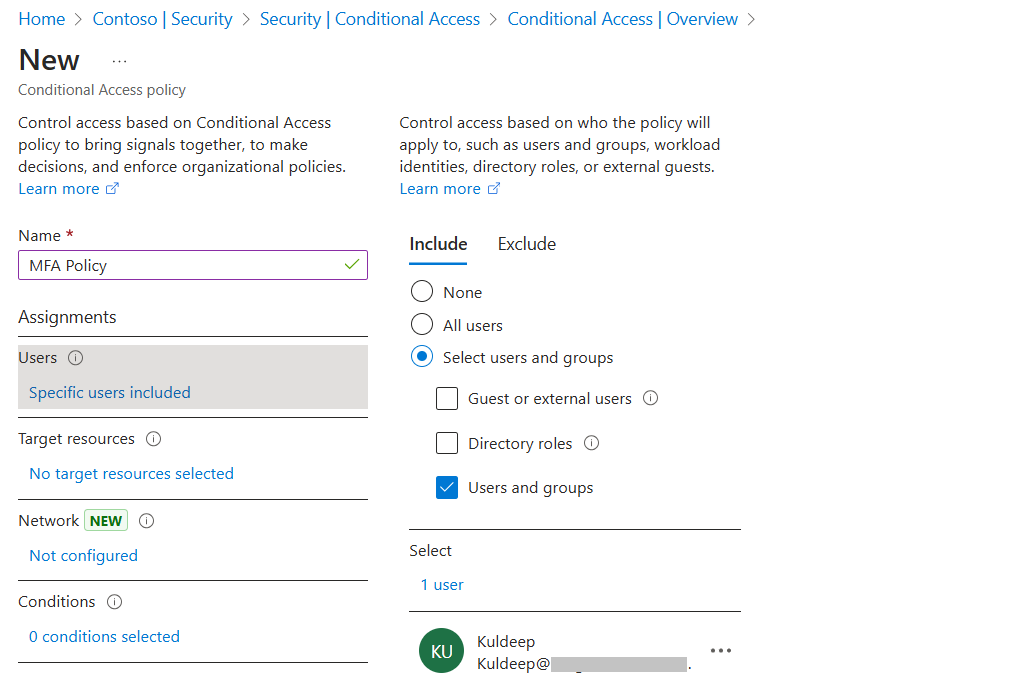
Give the name to policy For example, MFA policy or any name of your choice. Under Users or Workload Identities, you will select the user or group on which you want to enable MFA.
Under Users or Workload Identities, choose who will have MFA enabled:
- None: MFA won’t be applied to any users.
- All Users: MFA will apply to everyone in the tenant, including admins.
- Select Users and Groups: Choose specific users or groups for the MFA policy.
If selecting Select Users and Groups, you can pick the users or groups you want to enforce the MFA policy on.
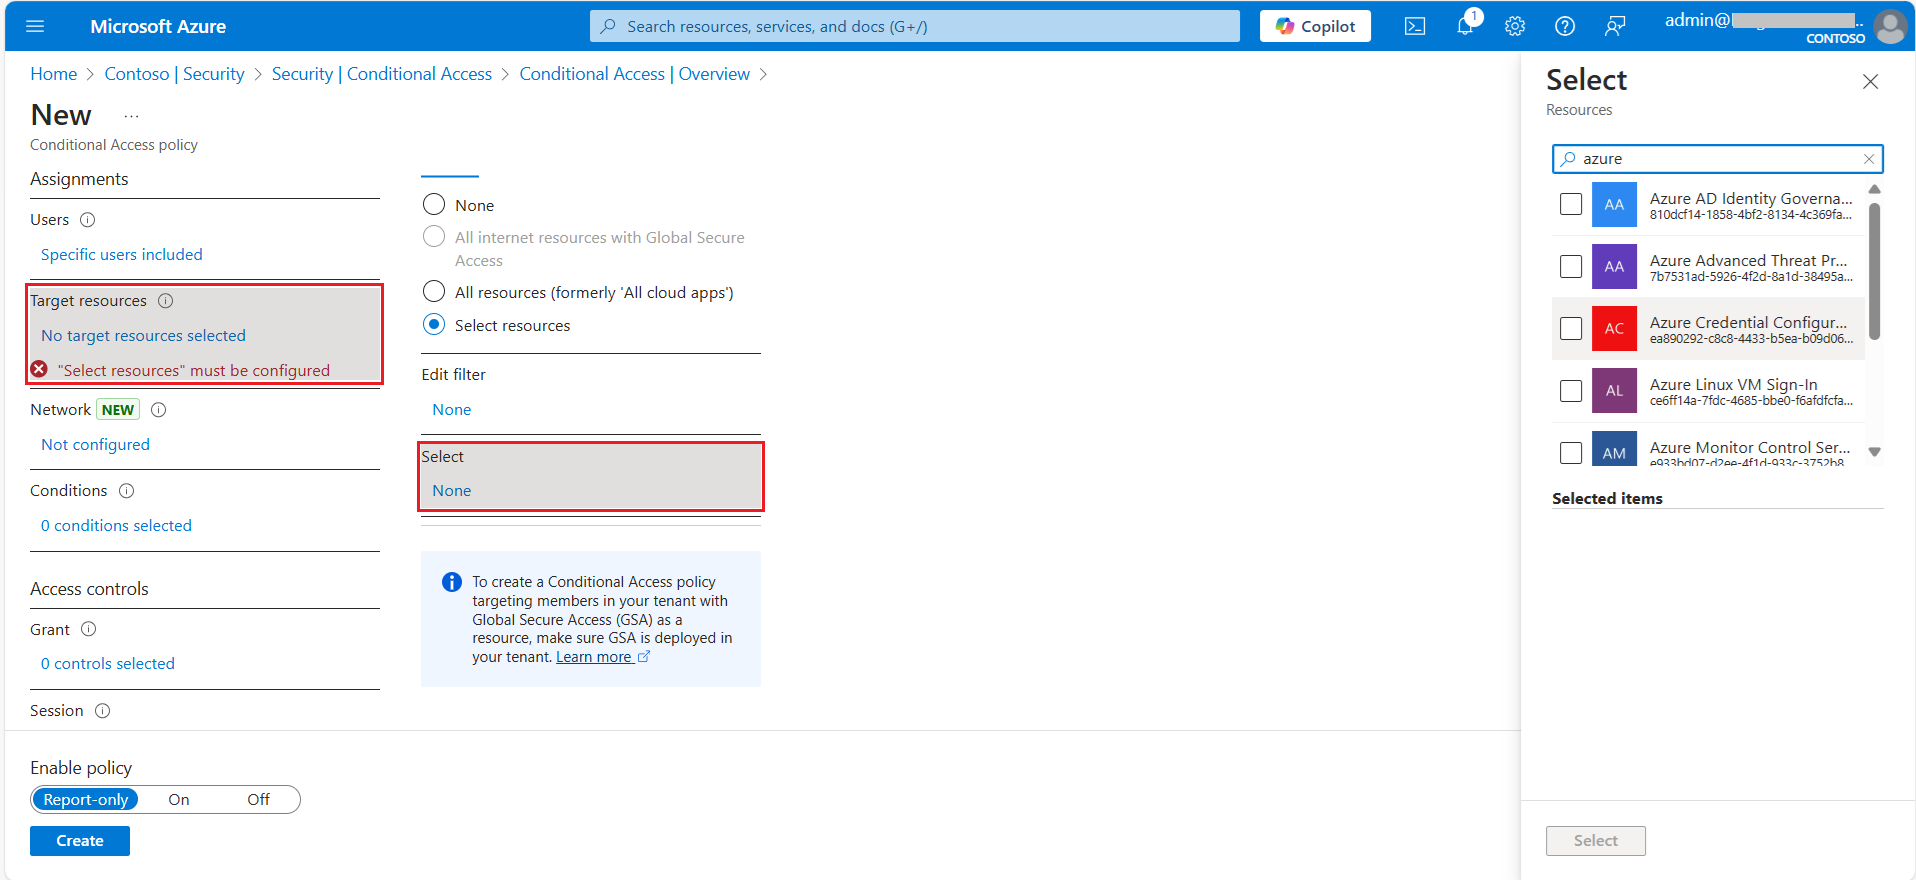
Once you’ve added users to the policy, the next step is to configure the applications where the MFA policy will apply. Under Targeted Resource, click to add applications.
Choose one of the following options:
- None: No application will be included in this policy.
- All Resources: This applies the policy to all Office 365 or Microsoft 365 applications.
- Select Resources: Add specific applications for this policy.
Also you can configure Network and locations (determined by IP address range or GPS coordinates) the user is signing in from.
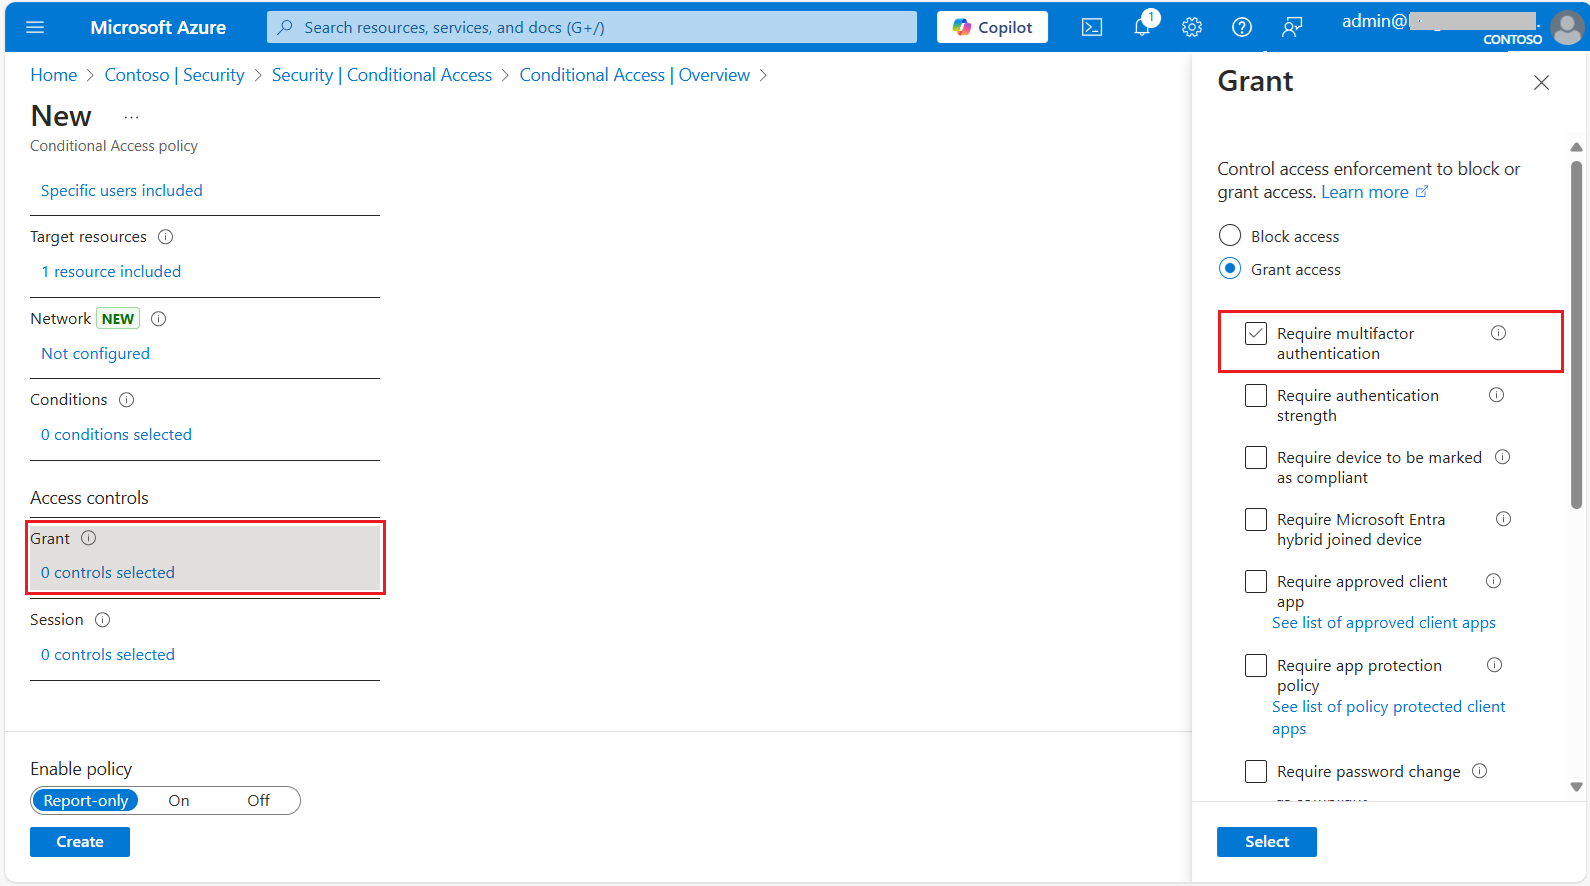
Now, once you have added the application, next step is we will trigger MFA on this particular policy. So, under Access Controls, under Grant, click on 0 Control Selected.
Here, make sure Grant Access is selected, and then check Require Multi-Factor Authentication. Click Select, so now this policy is created. Make sure Enable Policy is turned ON, and then click Create.
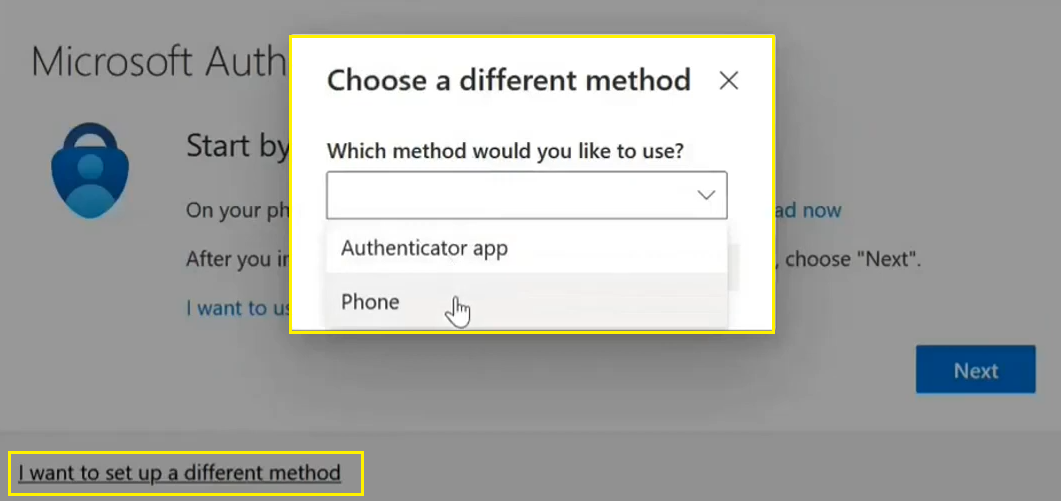
Once it is done and you’ll try to login to using the app we have selected then you have to configure MFA first. Because it is not Security Defaults so you can select either Authenticator app or a Phone.
Also Read: Set up an authenticator app as a two-step verification method – Microsoft Support

