
In this article, we’ll learn a Step-by-Step Guide to Installing FSLogix on WVD, Rule Editor, and Java Rule Editor. But before that, we have to understand the requirements for FSLogix.
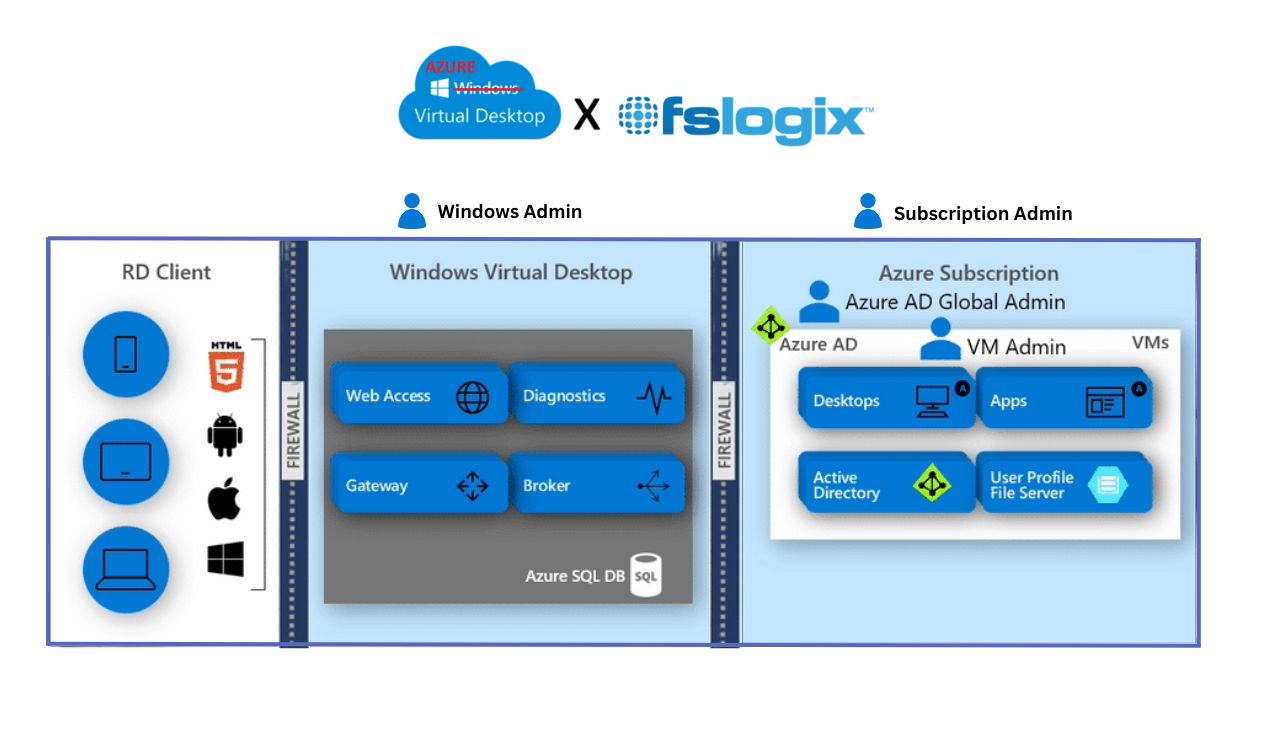
Read: What is FSLogix?
FSLogix Requirements
Supported Operating Systems
- Client OS: Windows 10 and Windows 11
- Windows Server: 2016, 2019, 2022
Note: Windows 32-bit architecture and Windows Server 2012 R2 has been deprecated since August 22, 2023.
Microsoft Licensing Prerequisites
- Microsoft 365 E3/E5
- Microsoft 365 A3/A5/ Student Use Benefits
- Microsoft 365 F1/F3
- Microsoft 365 Business
- Windows 10 Enterprise E3/E5
- Windows 10 Education A3/A5
- Windows 10 VDA per user
- Remote Desktop Services (RDS) Client Access License (CAL)
- Remote Desktop Services (RDS) Subscriber Access License (SAL)
- Azure Virtual Desktop per-user access license
Configure Antivirus file and folder exclusions
Antivirus creates a problem with FSLogix to function properly. We have to exclude the file and folder which are mentioned below.
- %TEMP%\*\*.VHD
- %TEMP%\*\*.VHDX
- %Windir%\TEMP\*\*.VHD
- %Windir%\TEMP\*\*.VHDX
- \\server-name\share-name\*\*.VHD
- \\server-name\share-name\*\*.VHD.lock
- \\server-name\share-name\*\*.VHD.meta
- \\server-name\share-name\*\*.VHD.metadata
- \\server-name\share-name\*\*.VHDX
- \\server-name\share-name\*\*.VHDX.lock
- \\server-name\share-name\*\*.VHDX.meta
- \\server-name\share-name\*\*.VHDX.metadata
Cloud Cache-specific exclusions
- %ProgramData%\FSLogix\Cache\* (folder and files)
- %ProgramData%\FSLogix\Proxy\* (folder and files)
How to Install FSLogix on WVD
- In the very first step, we’ll download the FSLogix application after downloading the FSLogixAppsSetup.exe executable file.
- Extract the downloaded zip file.
- Select the directory where you want to extract files.
- Choose Win32 (32-bit) or x64 (64-bit) based on your environment.
- Open the Release folder and Double-click on FSLogixAppsSetup.exe file
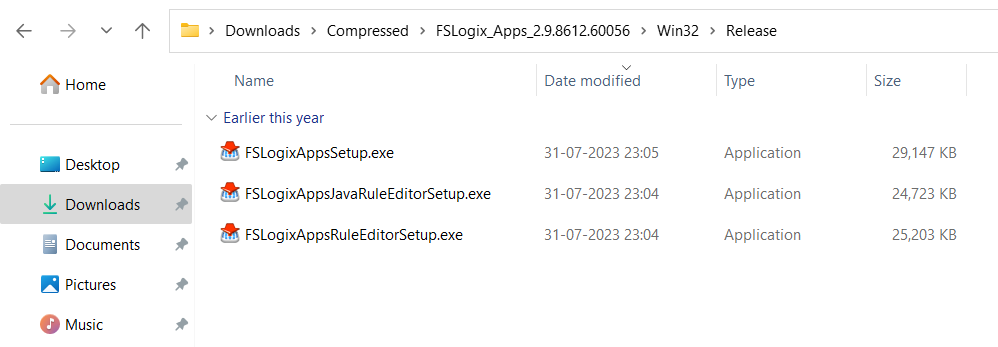
- Agree to the licensing terms, select Install.
You can also install FSLogixAppsRuleEditorSetup.exe or FSLogixAppsJavaRuleEditorSetup.exe which is located on the same folder.
How to Verify FSLogix product installation and version?
We can Verify the FSLogix product installation and version from Windows settings or from the command.
Verify the FSLogix product installation using the settings
- Press Windows + I to open the settings
- Select on Apps > Installed apps
- Locate Microsoft FSLogix Apps and you’ll see the app version.

Verify the FSLogix product installation using Command
- Sign in with local or administrative privileges.
- Press the start button then search for the command prompt and open it.
- Locate your directory to C:\Program Files\FSLogix\Apps using the cd and cd.. commands.
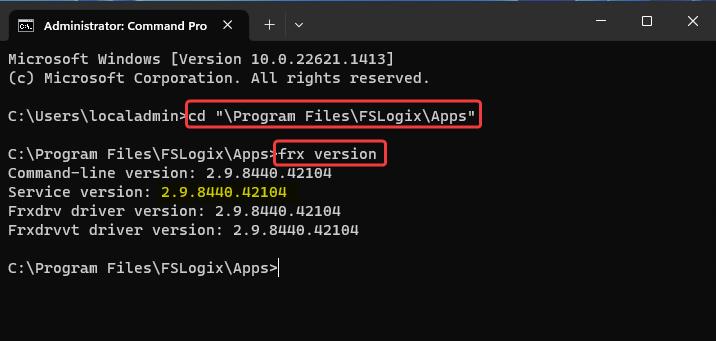
- Run the frx version command and it’ll show the FSLogix product installation version.
- Now we have installed the FSLogix app successfully. In the last steps, we have to set two main parameters. We can do so either through the registry or through local group policy. We’ll do it from the registry method which is easy to configure.
Registry Method to Configure FSLogix Profile Container
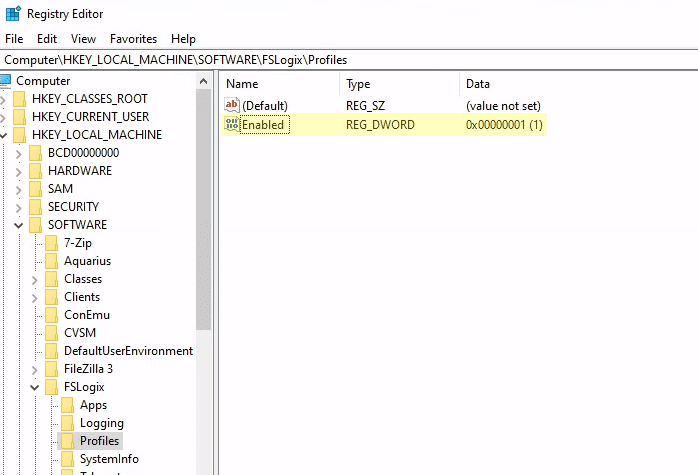
- Here we have to enable the profile abstraction.
- Go to “HKEY_LOCAL_MACHINE\Software\FSLogix\Profiles”
- Right-click on Profiles and create a “DWORD (32-bit) Value” named “Enable” with its value set to 1.
- Again, right-click on Profiles and create a “Multi-String Value” named “VHDLocations” and make its value set to your profile file server UNC path or a local path depending on your desired topology.

Note: Ensure that users have the correct share and NTFS permissions.
| User Account | Folder | Permissions |
|---|---|---|
| Users | This Folder Only | Modify |
| Creator / Owner | Subfolders and Files Only | Modify |
Note: Please make sure that while configuring FSLogix user should not have local profiles unless the user loses data unexpectedly. VHDX (64 TB Size) is preferred over VHD (2 TB size) due to its supported size and reduced corruption scenarios.
Verify your profile container configuration
Check FSLogix Profile Redirections
To check the lists of current active folder redirections we will use the “frx list-redirects” command. Below are the following steps to check the redirections.
- Sign in as a standard user.
- Press Windows + R and type cmd to open the command panel.
- By default your your path will be your user location. Change its location to C:\Program Files\FSLogix\Apps.
- Run the command “frx list-redirects”
- It’ll show all your current active folder redirections.
Check FSLogix Profiles VHDX Container
- Click on Start and open File Explorer.
- Navigate the VHDLocations location where you have configured FSLogix with NTFS permission to store FSLogix profiles.
- If everything is configured successfully then you will see your user name and SID to the same VHDLocations.
FSLogix product support Guide
- If the problem can’t be identified in the logs captured by the FSLogix Support Tool, from a memory dump, or the trace ETL files then we need to clean the installation of Windows
- If the VM crashes, the FSLogix application service crashes or faces a deadlock problem then the troubleshooting will be performed through a memory dump.
- If you have configured your environment with a third-party setup then you are facing the problem like compatibility. So here issue can’t be resolved with a product update.
For more clarification Visit Microsoft FSLogix Product support page.